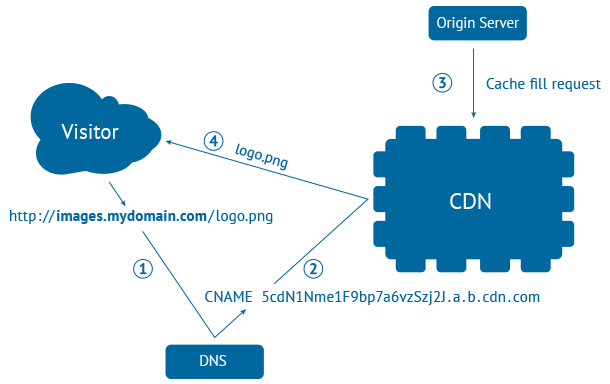
در این پست قصد داریم شما را با نحوه ایجاد و تنظیم CDN محتوای ثابت روی سروری که بر روی آن لینوکس CentOS 7 نصب شده است، آشنا کنیم. برای انجام این کار کافیست مراحلی که در ادامه مطلب آمده است را گام به گام طی کنید:
1. ابتدا با استفاده از دستور زیر پکیج های نرم افزاری سیستم خود را به بروزرسانی کنید.
#yum -y update
2. سپس با استفاده از دستور زیر باید سرور Nginx HTTP را از مخزن EPEL نصب کنید:
# yum install epel-release
# yum install nginx
3. هنگامی که وب سرور Nginx نصب شد، شما می توانید nginx را برای اولین بار اجرا کنید و تنظیم آن را به گونه ای انجام دهید که از این به بعد به صورت خودکار و با بوت شدن سیستم اجرا شود. برای این کار از دستورات زیر استفاده کنید:
# systemctl start nginx
# systemctl enable nginx
4. به صورت پیش فرض، فایروال تعیبه شده در CentOS 7 به گونه ای تنظیم شده است که ترافیک های Nginx را بلاک کند. برای رفع بلاک این ترافیک روی Nginx، قوانین (rule) فایروال را آپدیت کنید به طوری که بسته های ورودی HTTP و HTTPS اجازه عبور داشته باشند. این کار با اجرای دستورات زیر قابل انجام است:
# firewall-cmd –zone=public –permanent –add-service=http
# firewall-cmd –zone=public –permanent –add-service=https
# firewall-cmd –reload
برای باز کردن تمامی کانکشن ها (جهت تست و تمرین) و حذف فایروال و پاک کردن جدول های آن نیز می توانید از دستور زیر استفاده کنید (توجه داشته باشید که این دستور را در محل کار خود هرگز اجرا نکنید 🙂 ).
# yum remove firewalld && iptables -F
5. در مرحله بعدی با تایپ http://SERVER_DOMAIN_NAME_OR_IP (که باید مطابق با نام دامنه و یا آی پی شما پر شود) در مرورگر خود صفحه پیش فرض nginx را مطابق تصویر زیر مشاهده می کنید.
فایل ها و دایرکتوری های مهم Nginx
- دایرکتوری root پیش فرض سرور (بالاترین سطح دایرکتوری شامل فایل های پیکربندی (config):etc/nginx/
- فایل اصلی کانفیگ Nginx در etc/nginx/nginx.conf
- تنظیمات مربوط به کانفیگ سرور (هاست های مجازی) می تواند در فایل زیر اضافه شود: etc/nginx/conf.d/
- دایرکتوری پیش فرض داکیومنت سرور: usr/share/nginx/html/
6. حال باید کدهای زیر را به منظور انجام تنظیمات لازم برای کَش کردن محتوای ثابت با nginx در فایل conf.d وارد کرده و سپس آن را ذخیره کنید:
cd /etc/nginx/conf.d/ #changes directory

vim cdn.conf #create a config file with below content.

upstream cdn {
server cdn.linuxscriptshub.com; #origin (this is the web server been create earlier)
}

proxy_cache_path /mnt/nginx/cdn levels=1:2 keys_zone=cdn_cache:10m max_size=10g
inactive=60m use_temp_path=off;
#cache setting http://nginx.org/en/docs/http/ngx_http_proxy_module.html#proxy_cache_path

server {
listen 80;
server_name www.linuxscriptshub.com;  #your domain name ie: www.linuxscriptshub.com
access_log /var/log/nginx/cdn.access.log; #your cdn access log
error_log /var/log/nginx/cdn.error.log; #your cdn error log


location ~* .(mp4|gif|jpg|png|html|htm|css|js|ico|swf|pdf)$ {
#in root location, every file content these file format will be serve as a cache # this line must be include on cdn server and origin backend server.
proxy_redirect off;
#http://nginx.org/en/docs/http/ngx_http_proxy_module.html#proxy_redirect (we dont need rewrite when proxy to upstream)
proxy_pass http://cdn;
#proxy_pass to the upstream that we set.
proxy_set_header Host $http_host;
#An unchanged “Host” request header field can be passed like this
expires 5m;
#cache will be expire in 5minutes
proxy_cache cdn_cache;
#proxy pass to the cache rules we setup on top of the config file
proxy_cache_revalidate on;
#cache will be revalidate with the origin server if it is expire
add_header Johnson-CDN-Cache $upstream_cache_status;
#with this header you can know the status of the content been cache or MISS. (can check via inspect element, network)
}

location / {
proxy_redirect off;
#http://nginx.org/en/docs/http/ngx_http_proxy_module.html#proxy_redirect (we dont need rewrite when proxy to upstream)
set_real_ip_from 0.0.0.0/0;
real_ip_header X-Real-IP;
real_ip_recursive on;
proxy_set_header X-Real-IP $remote_addr;
proxy_set_header X-Forwarded-For $proxy_add_x_forwarded_for;
#proxy pass the origin client ip to the upstream server
proxy_pass http://cdn;
#proxy_pass to the upstream that we set.
proxy_set_header Host $http_host;
#An unchanged “Host” request header field can be passed like this
}
8. با استفاده از دستور زیر یک دایرکتوری cache ایجاد کنید که در واقع این دایرکتوری حافظه cache شما محسوب می شود:
mkdir /mnt/nginx/cdn
chown -R nginx.nginx /mnt/nginx/
نکته: دستوراتی که در بالا به آنها اشاره شد، برای ایجاد یک CDN سرور است که برای یک نقطه جغرافیایی از کشور در نظر گرفته می شود، تنها کاری که باید در ادامه انجام دهید این است که دامنه خود را به CDN سرور ایجاد شده اشاره دهید. در صورتی که تمایل داشته باشید، این سرور را در کشورهای مختلفی راه اندازی کنید، باید از ماژول nginx geo استفاده کنید.
نفیسه دانشگرمقدم
Latest posts by نفیسه دانشگرمقدم (see all)
- نحوه ارسال هرزنامه ها به صورت اسپم - آذر ۲۸, ۱۴۰۰
- 7 نکته برای کاهش اندازه دیتابیس وردپرس - دی ۳۰, ۱۳۹۹
- نحوه تعریف فوروارد ایمیل در cPanel - آذر ۲۴, ۱۳۹۹


